
How to Use the Smart UTM Builder and UTM Tracker to Measure your Marketing ROI
In marketing, Tracking your customer journey does not have to be difficult. You shouldn’t have to sort through thousands of data points just to be able to answer the question: how did our ad do? That’s why we created the industry-leading UTM Smart Manager. This article will show you how to use the UTM Builder and UTM KPI tracker so that you can derive the best insights from your multiple paid media channels and increase your marketing ROI. The best part, you can achieve this marketing insights nirvana stage in as little as three steps!
A word on UTM insights (also known as UTM Tracking)…
The Urchin Tracking Module (UTM) refers to the tags that you add at the end of your campaign URL in order to help you better understand where your customer is coming from. Whenever a person clicks on these UTM links, the parameters that make up the link get sent to your Google Analytics (or other analytics platforms). Consequently, you’re able to sort through your traffic data and determine which channels, campaigns, or even ads attracted the most relevant traffic (and how that traffic engaged in your site). Ultimately, this helps you measure the ROI per Ad (or UTM link) released.
Suffice it to say, if you ever want to track ROI per ad as a marketer, a UTM will be absolutely necessary.
If you’re interested in learning more about how UTMs work, you can learn more about UTMs here.
So, now that you’ve decided that you can actually make more money by employing proper UTM building and tracking techniques, we’ll walk you through the HOW.
How to Use the Smart UTM Builder & UTM Tracker
Every Smart UTM Manager user gets their own customized UTM Builder form. This form is comprised of the parameters needed to build UTMs correctly.
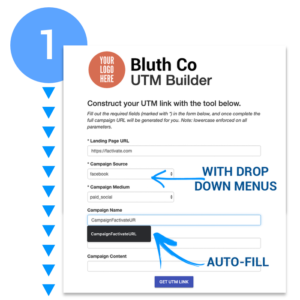
STEP 1: Make sure every member of your team has access to the UTM Builder
Any member of your account will have access to this form and we recommend they use it whenever you need to build a UTM link. Your custom-made UTM Builder form will likely be located in a URL like the link below:
https://app.factivate.com/utm_form/yourorganizationname/
Each form contains a dropdown for your campaign source and campaign medium. By default, you get the following the options (or tagging definitions) for these two parameters :
Campaign Source
- bing
- conference+brochure
- constantcontact
- duckduckgo
- event
- formsignature
- pandora
- snapchat
- spotify
- yahoo
- youtube
Campaign Medium
- affiliate
- banner
- billboard
- blog
- cpc
- carousel
- direct
- display
- ebook
- feed
- online_radio
- organic+social
- paid+social
- partner
- ppc
- presentation_link
- press
- text_link
- qr_code
- retargeting
- tv
- widget
STEP 2: Make sure the source and medium list fields are what you want.
We provide these as a great initial list to help you get started. However, if you wish to expand or shorten it, you are able to edit these fields as you see fit. If you have any questions, please email us here
NOTE: Enforcing these source/medium naming conventions is critical to maintaining your data integrity and help you get good insights when you try to analyze your impact per source/medium in Google Analytics or within our Smart UTM Tracker.
STEP 3: Connect to your Facebook Ads, Google Analytics, and Adwords accounts
Your UTM Builder form will be communicating directly with your UTM Tracker. Before you can get your dashboard and KPIs automatically pulling data from different channels, you’ll need to connect them. Here is a quick one minute video on how to connect:
Written instructions:
- Go to https://app.factivate.com and log into your account
- On your home screen, you will see a file named Campaign URL Builder. Click to open the file
- On the upper right-hand side, there’s a button labeled Connectors, Click on it.
- On the pop up, you will need to connect to ALL buttons. This includes
- FBAds
- FBDemo
- Adwords
- GAUTMs
- GA
- GaDemo
- After you click on each button, it will ask you to log into the platform and select what account you’d like to pull from.
NOTE: Each one of these buttons is essentially responsible for pulling specific data from the platform. For example, the FBDemo button will connect to your Facebook Ads account and pull only demographics data whereas the FBAds button will not pull any demographic data.
If you’ve connected the data, a sync icon will appear next to each button.
Please allow up to 24 hours for all of your data to be pulled in successfully. This time will depend on the amount of data that will need to be pulled in.
STEP 4: Go Review and Edit Your Benchmarks in the Benchmark Tab
In this tab, every number is manually set (ie CPC, Bounce Rate etc). Make sure these align with your company and your practices as these will be reflected in your dashboard and analysis.
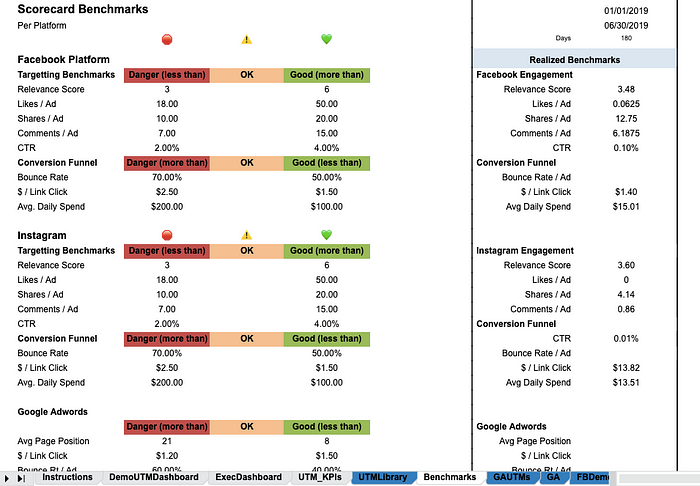
If you don’t know what to set for your own benchmarks, we provide the average KPIs for the past 180 days in the right-hand side to help you as a starting point.
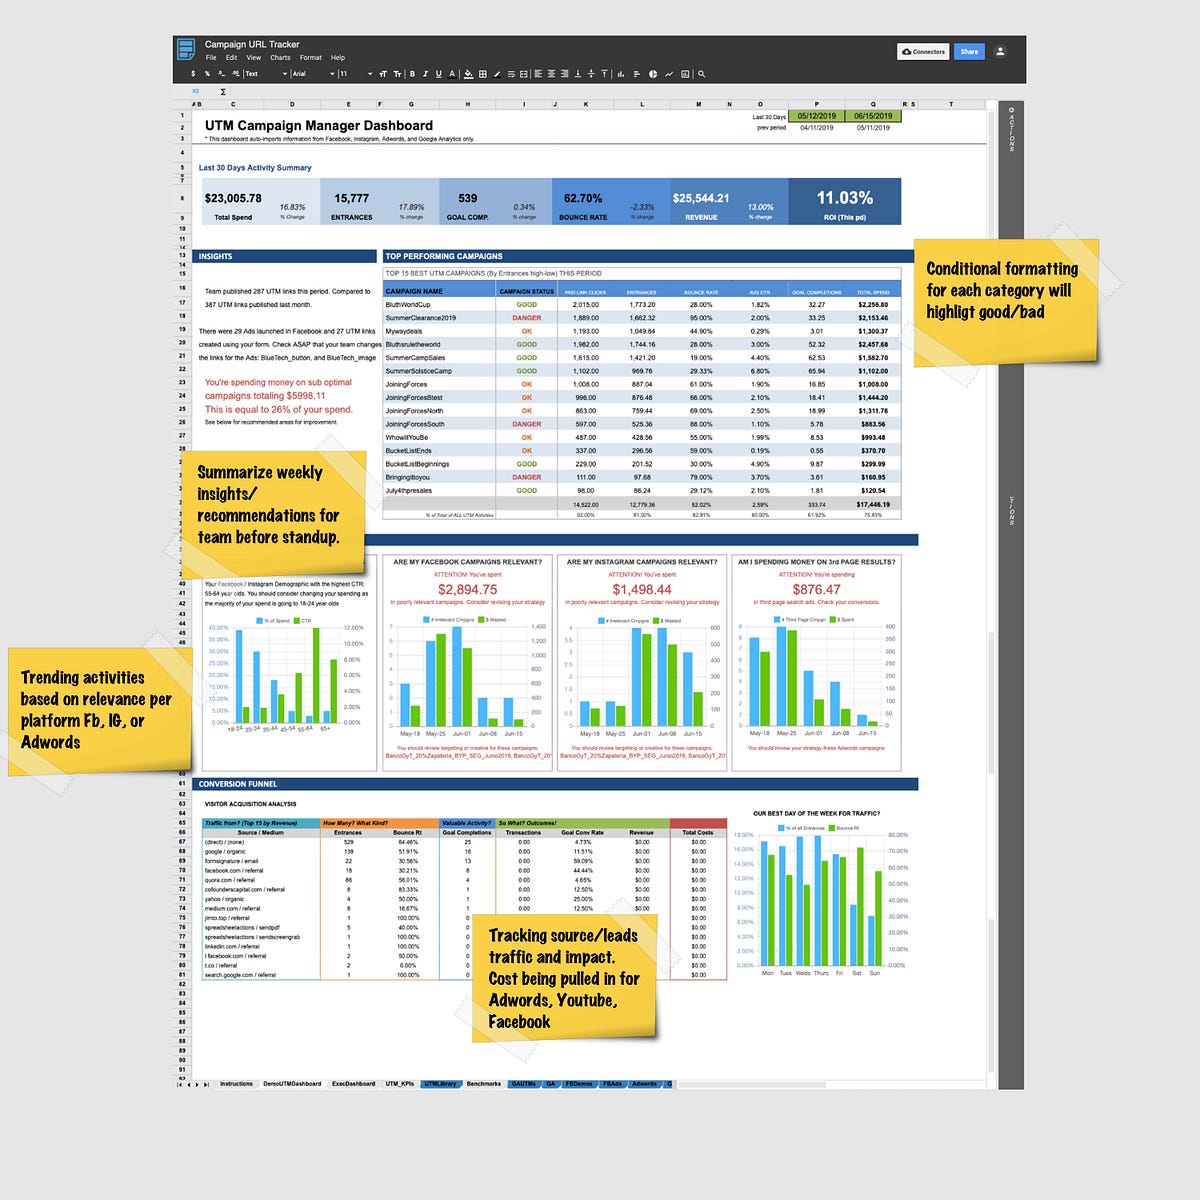
Step 5: Go to the Exec Summary to get insights on your UTM campaigns
Below is an image on how to read the Exec Dashboard for your UTM management. Be sure to keep an eye on the top UTM Campaign section. This section will provide automated reporting between Facebook, Adwords, and Google Analytics.
Please let us know if you have any questions at [email protected]. We’re more than happy to help.